 We use cookies to ensure that we give you the best experience on our website.
 How it works?
MageNative Mobile App Documentation
How to Create Your Store App
Introduction
MageNative App converts Magento E-commerce site to mobile shopping app, Fully synchronized with magento platform to provide realtime data with best user experience. MageNative App will boost your revenue exponentially. This manual will explain step by step process to build and configure app.
App Installation
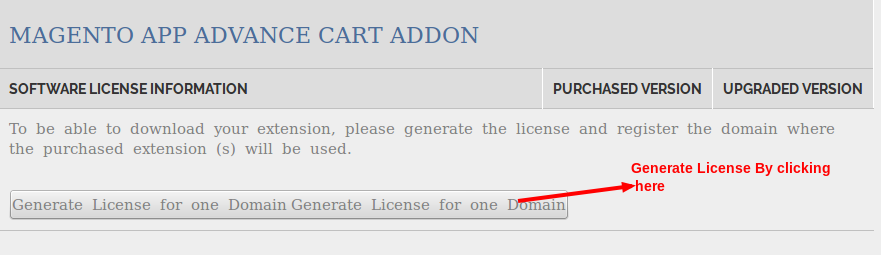
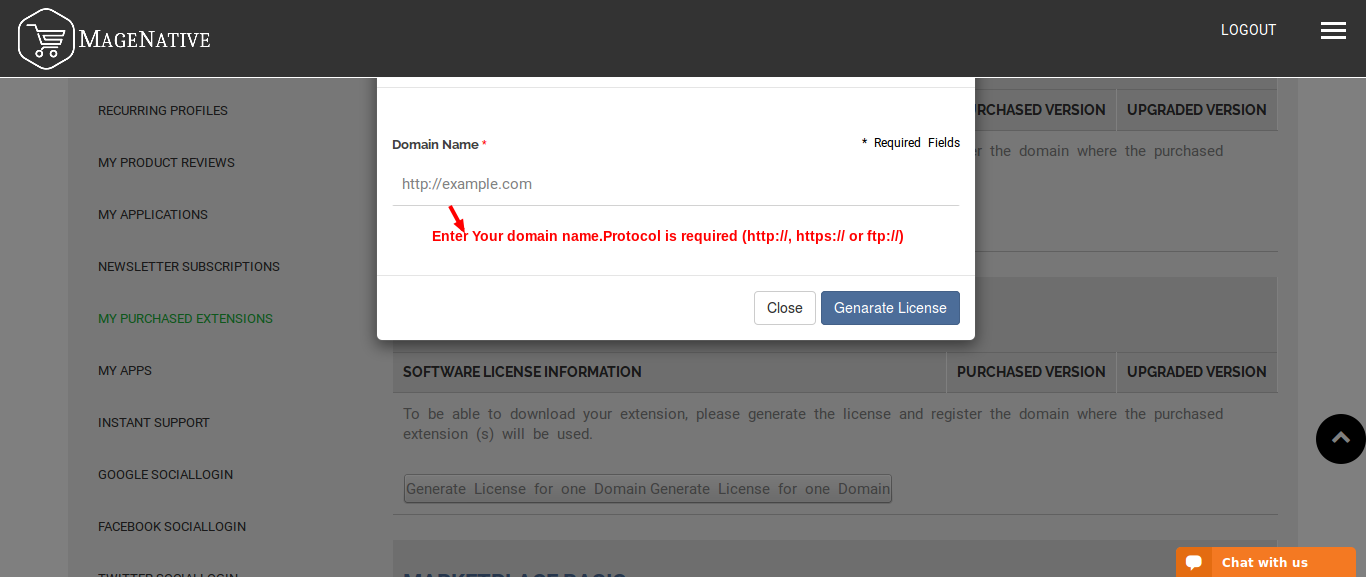
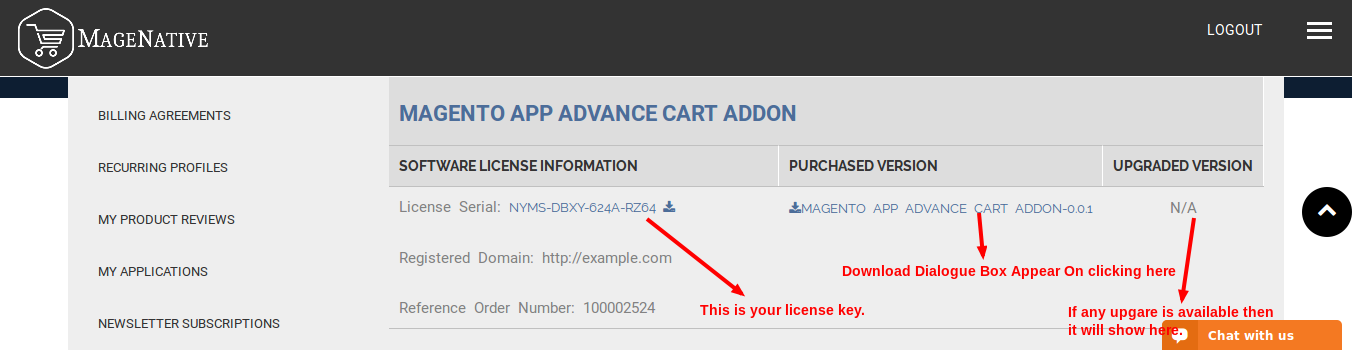
Once you buy MageNative app you can download connector module from "My Purchased Extension" tab in customer account section on our site MageNative. There you see a list of all purchased module. In order to download module first you have to create license for your domain. You can create license by clicking on "Generate License For One Domain".
Follow the below easy steps to install connector:-
1)Pre Installation steps
-
Step 1: Disable Compilation
First of all check your compilation status by the System-> Tools -> Compilation if it is enabled, disable your compilation first.
After installation you can again enable your compilation. -
Step 2: Disable Cache
Disable your entire cache from the System -> Cache Management menu from the admin site.
After installation you can re-enable your cache. -
Step 3: Backup Database (Optional)
Before installation of the extension you can take backup of your database if any issue occurs during installation so you can revert back your database backup.
2)Installation Using Magento Connect
-
Step 1: Copy Extension Key
To install the extension from the Magento-Connect you just need to go to the relevant page where the ced-mobiconnect extension exists. Then choose your platform & copy your extension key.
-
Step 2: Install Extension By Key
Now go to the admin site of the magento site and go to the system ->Magento Connect ->Magento Connect Manager. Login to the downloader platform.
Paste your key to the below highlighted area and click on install.
Image
After clicking on install you will see the details of the extension with its version you can proceed and your extension will install in few moments.
3)Installation Using Package Upload
-
Step 1:
When you purchased the extension from our official site you will get the full package of the extension.Go to the package downloader wizard (Magento Connect Manager).
-
Step 2:
Go to the section “Direct Package File Upload” and browse for the package then click to the upload button. This will install the extension you can monitor the progress in the console area bottom.
Image
4)Installation using ftp
-
Step 1:
If you have any issue in the installation process in the above two method you can use the native installation method by FTP. Connect your FTP and go to the root directory of the magento installation. Unzip our package which you get after purchase. You will get the two folders “Step 1” and “Step 2” Upload all the files of “step 1” to the root directory first after upload of the “Step 1” upload all the files of the “Step 2”.
5)Post Installation Steps
-
Step 1:
When you are done with the installation of the extension you can logout your admin and re-login to the admin section
-
Step 2: Enable Cache
Clear all the your caches first and if required can enable your cache.
-
Step 3: Enable Compilation
If you need compilation enabled you can enable it again
Build your app
You can build your app from "My Apps" tab in customer account section on our site MageNative. Building an app is a 4 step process. We will discuss each step one by one.
Step 1: Design
This step will decide the look and feel of your app. So in this step you need to provide basic information of your shopping app. Please fill in all the fields and click save to move to next step.
App designing screen can be found as below screen.
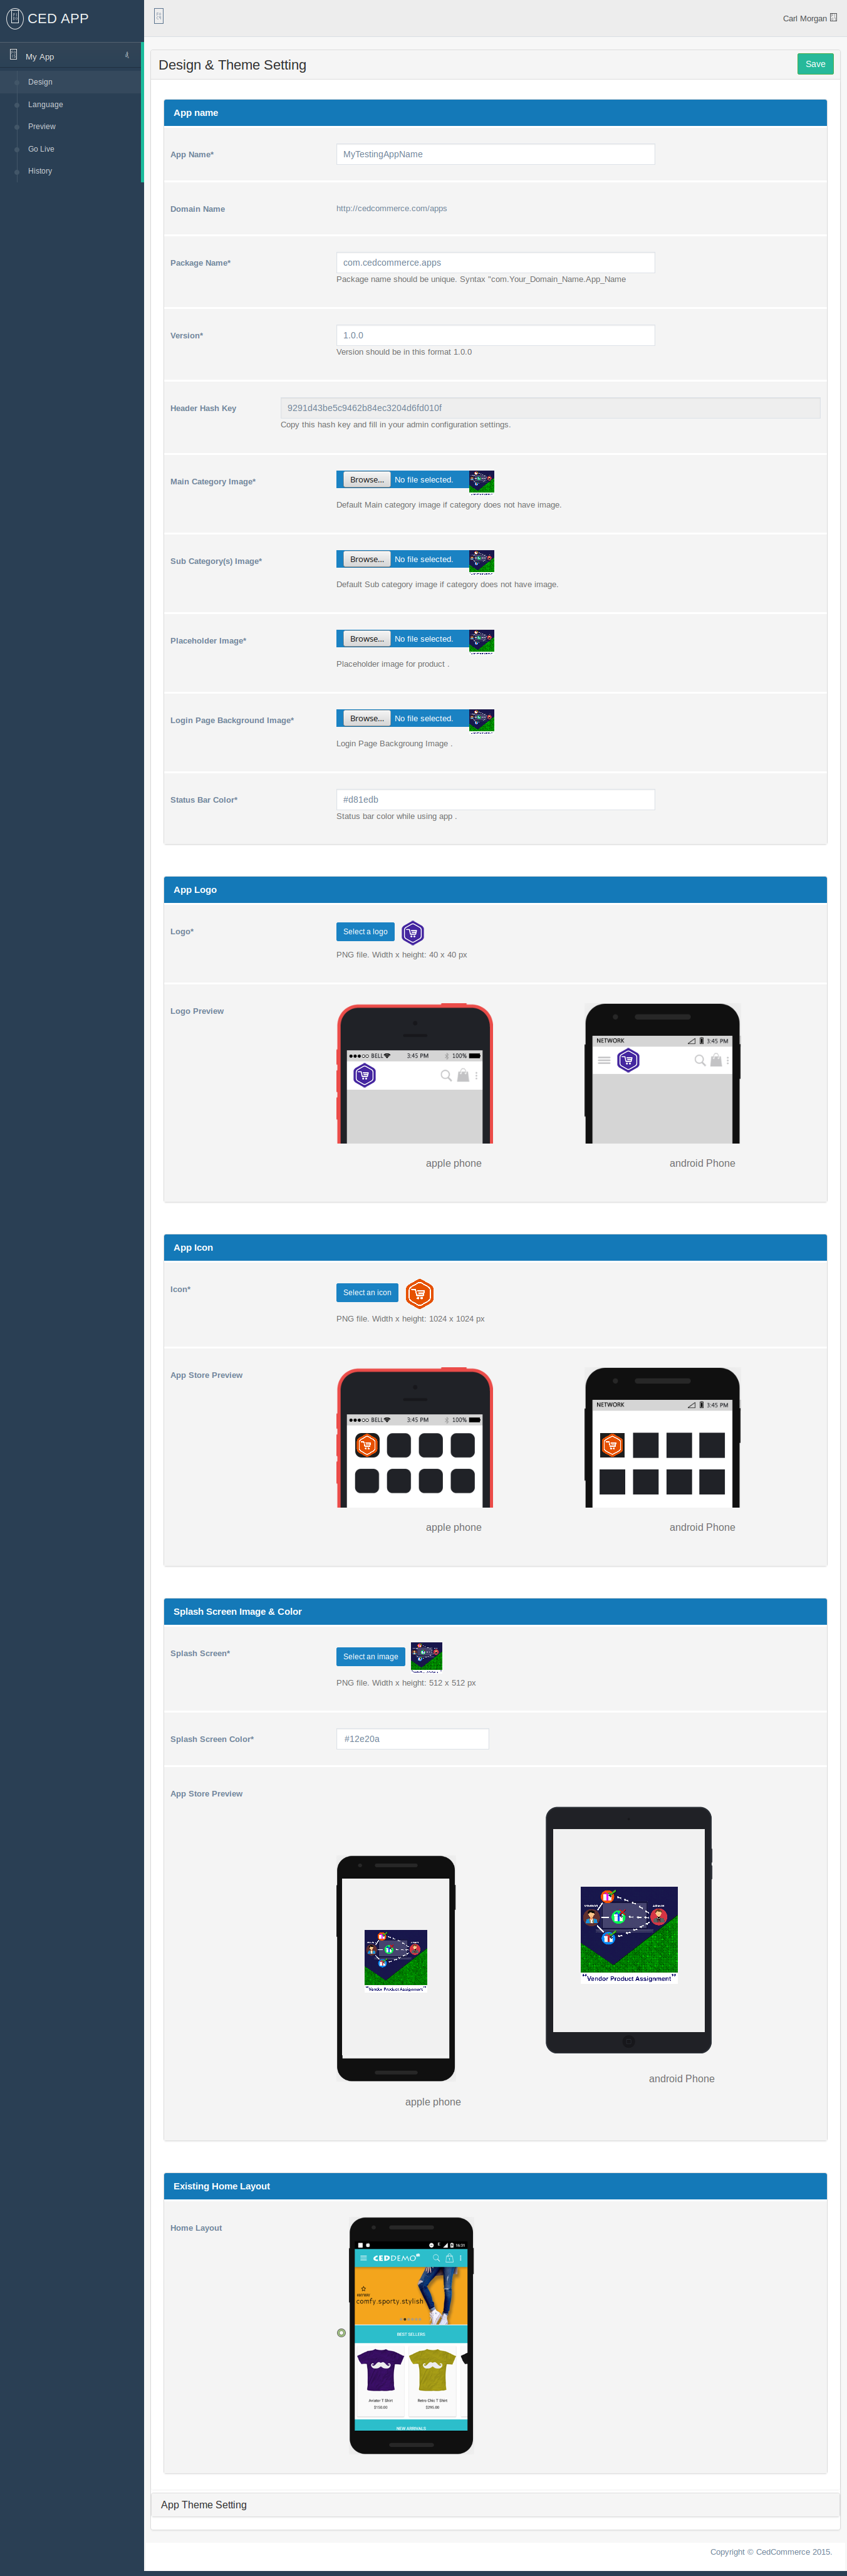
- App Name: The name of your app which you want to display in app
- Domain Name: The domain of the store of which you want to generate app. If you purchased license for more than one domain then it will be select field otherwise the domain appear only as a label.
- Base URL: The base url of the store of which you want to generate app. You can get your base url from system->configuration->general->web->Secure->Base URL from magento admin.
- Package Name: The name of your app package. It should be unique and follow the syntax "com. Your_Domain_Name.App_Name".
- Version: The version of your app. It should be in this format "1.0.0".
- Header Hash Key: This is a autogenerated secret key.Make a note of it. You need it during configuraing module, Without it your app will not receive api feeds.
-
Main Category Image: This is the image which will be showed on category list page in app.
Note: The image shows only if category banner is disabled or you didn't create any category banner. -
Sub Category Image: This is the image which will be showed on sub-category list page in app.
Note: The image shows only if parent category does not have any product and if you didn't upload any category banner image from admin. - Placeholder Image: This is the image which will be showed untill your image does not loads.
- Login Page Background Image: This is the image which will be showed in background on login page.
- Logo: The logo of your app which will be displayed on top of the home page. It must be a ".png" file with a dimension of 1024 x 1024(width x height)px.
- Logo Preview: This will show you the preview of the logo which you had uploaded in previous field for both android and ios app.
- App Icon: The icon of your app which will be shown in main menu of your phone.It must be a ".png" file with a dimension of 1024 x 1024(width x height)px.
- App Store Preview: This will show you the preview of the logo which you had uploaded in previous field for both android and ios app.
- Splash Screen: The splash screen image of your app which will be displayed whenever your app is loaded. It must be a ".png" file with a dimension of 512 x 512(width x height)px.
- Theme Color: This field will let you to decide the background-color of your splash screen.You can easily select any color from color picker px.
- APP Store Preview: APP store preview will let you to see how your splash screen looks with selected image & color combination.
- Home Layout: APP store preview will let you to see how your splash screen looks with selected image & color combination.
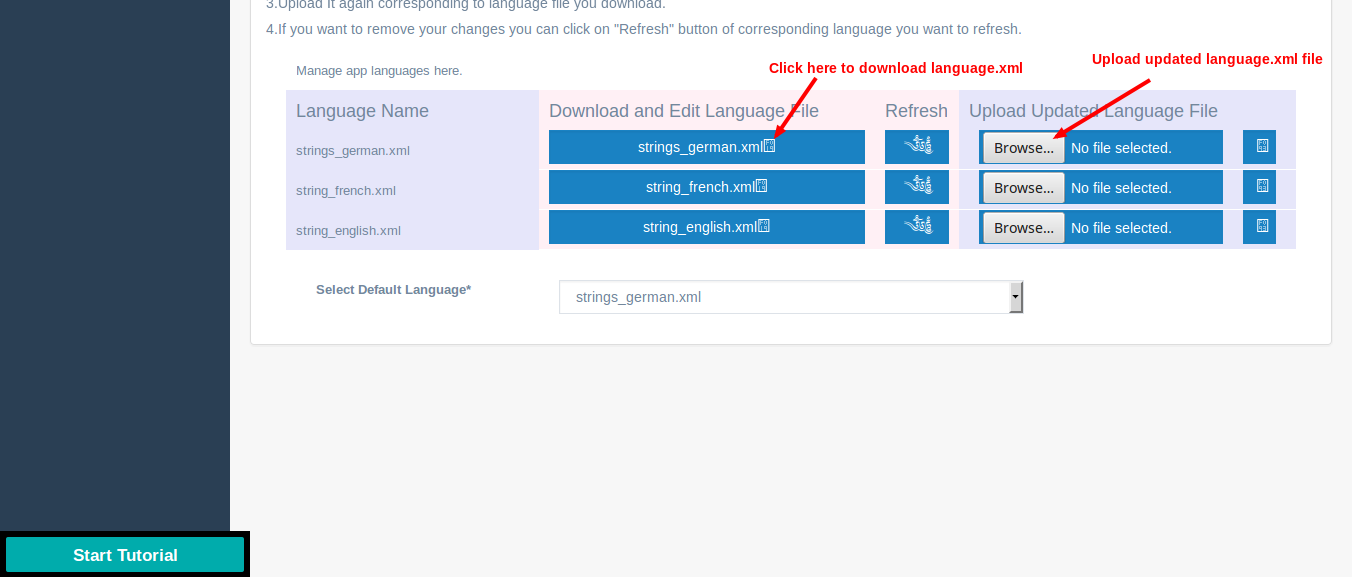
Step 2: Language
This step will allow you to define various text and labels coming in app in different languages so that when customer change store from app then they see various text and labels in default store language. You can change any text coming in app by downloading and replacing text with new text in "language.xml" file corresponding to language for which you want to change labels. Once you finshed editing upload the file again and click on save button on top right corner.
Step 3: Preview
In this step you need to provide some details to enable various important functionality like "Social Login", "Google Cloud Messaging", "Google Analytics" etc. You need to enter details separately for android and ios app.
Preview image screen will look as in below image
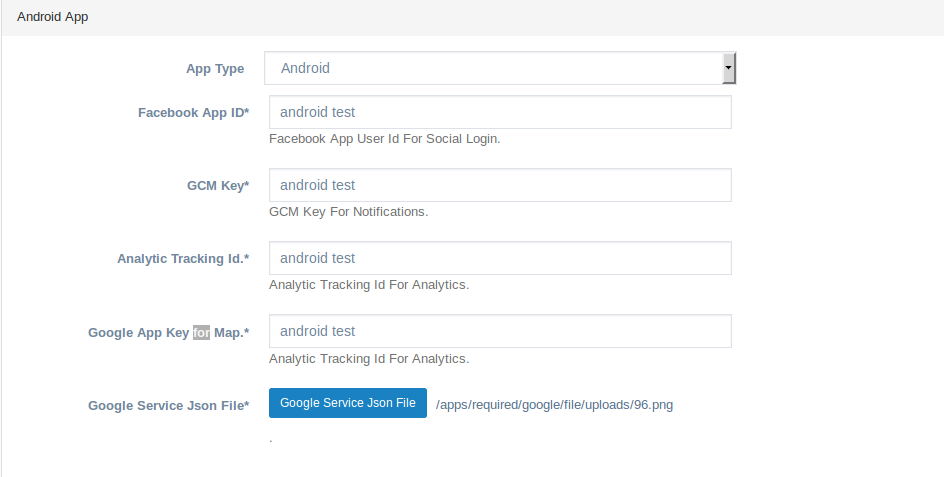
- APP Type: You can provide details for android and ios app separately by selecting "Android App" or "IOS App"
- Facebook App Id: We need facebook app id so that you can use facebook login in your magento app. You can get facebook login from Facebook App ID. To get facebook app id, just click the given link, Log in with your facebook account -> Go to My Apps -> Select 'Add New App' or follow the steps listed there.
- GOOGLE MAP KEY: From here you can provide your google map key. We need this to show your store on google app which comes under contact us page in our app.
- GCM KEY: From here you can provide the gcm key in order to use google cloud messaging service in our app. You can get gcm key by signing up here GCM KEY and following the instruction given there.
- GCM ICON: From here you can provide the icon which you wabt to send in gcm notification.
- Want Analytics: Check the checkbox if you want to use google analytics in your app.
- Google Service JSON: To use google analytics and google cloud messaging you have to upload the file. Click here Google Service JSON to create and download the Google Service JSON file.
- IOS Account User: IOS Account User Name. This field comes only if you select "IOS" in app type field above.
- IOS Account Password: IOS Account Password. This field comes only if you select "IOS" in app type field above.
Step 4: Go Live
This step will allow you to publish your google and ios app on respective store. You can publish your app either by your account or by using our account.
Live image screen will look as in below image
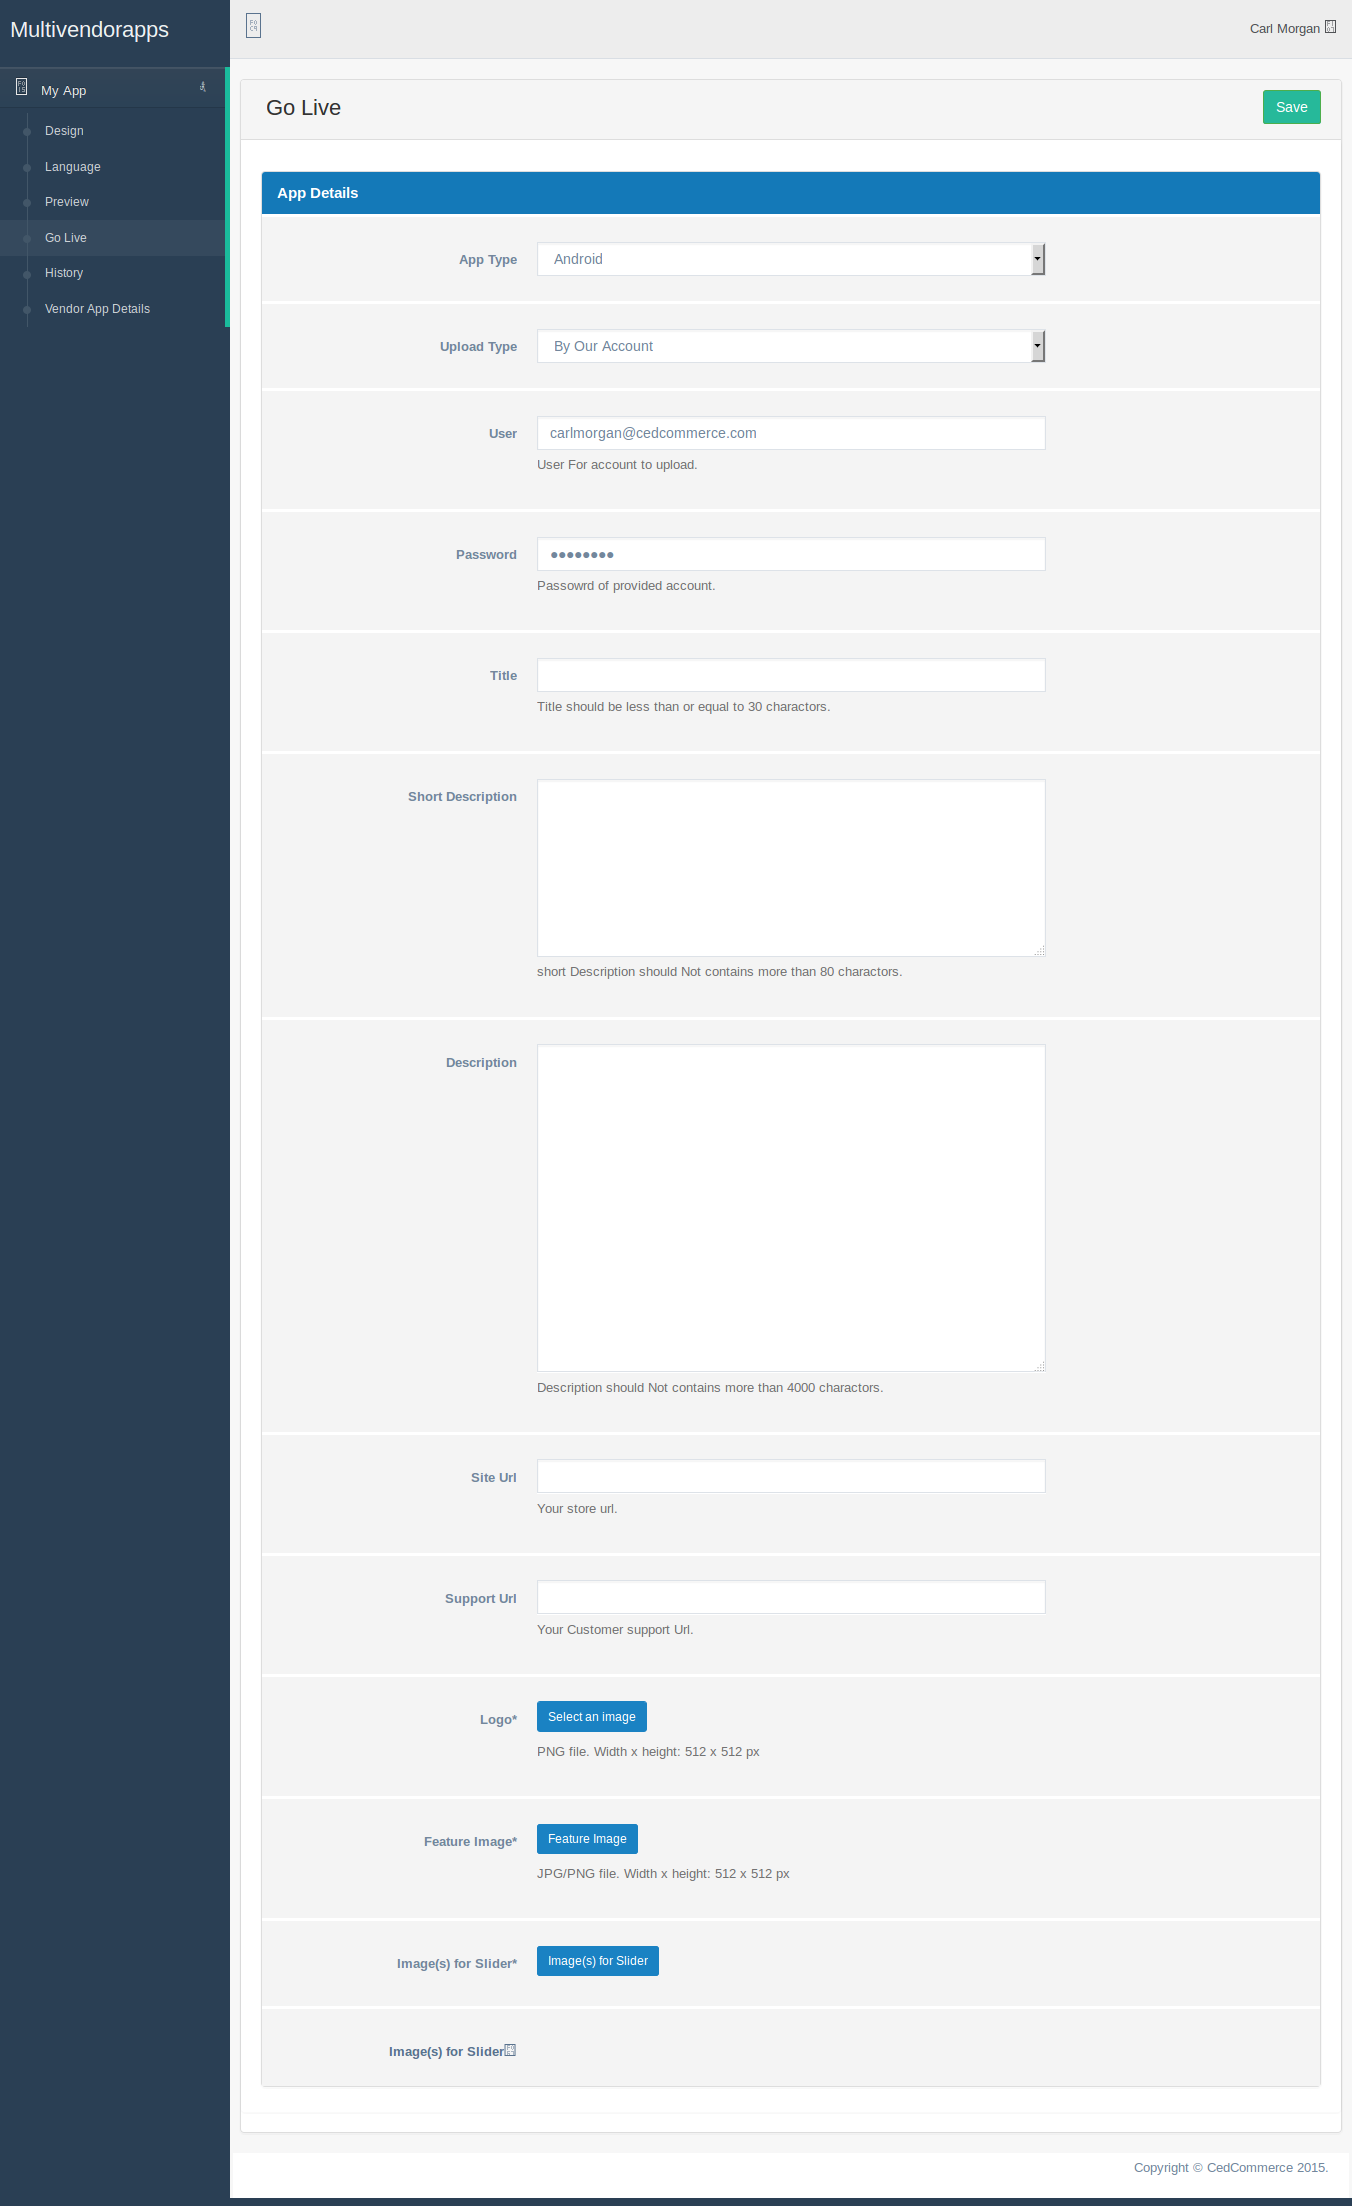
- APP Type: You can provide details for android and ios app separately by selecting "Android App" or "IOS App"
- Upload Type: From here you select whether you want to publish your google or ios appon respective store by our or your account.
- User: This field only comes if you want publish app by your account. This is your account name with which you want to publish your app on respective store.
- Password: This is the password of your account with which you want to publish your app on respective store.
- Title: This field will allow you to provide title for your app which shows on store.
- Short Description: This field will allow you to provide short description for your app which shows on store.
- Description: This field will allow you to provide description for your app which shows on store.
- Logo: This field will allow you to provide logo for your app which shows on store.
- Feature Image: This field will allow you to upload main feature image of your app which shows on store.
- Feature Image For Slider: This field will allow you to upload multiple feature image of your app which shows in feature-slider on store. You can upload any number of image by clicking in images for slider link.
App Configuration
Once You are done with building app and connector installation you can configure various features of your app in connector. This section will explain you various way to configure app using connector.
Configure MageNative Basic App for Magento
MageNative basic app convert your magento Ecommerce website to mobile app very easily.
Activate Your Module
To activate your module you have to enter the license key which you received in App installtion step in system->configuration->License Info section under "CEDCOMMERCE" tab.

Enable/Disable Mobiconnect Module
It is a yes/no type field which is used to enable or disable mobiconnect module.
To enable/disable module please go to Mobiconnect->Connector Setting->App configuration. You can set it up by changing value in below highlited area from magento admin panel.

Note: If it is set to NO then your app will not receive api feed from magento site.
App Unique Key
We use this unique key to authenticate app with connector.You can get the app unique key from our dashboard.
To setup secret key please go to Mobiconnect->Connector Setting->App configuration. You can set it up by changing value in below highlited area from magento admin panel.

Enable/Disable New Arrival
It is a yes/no type field which is used to show new arrival product group on homepage of your app.
To setup new arrival product group please go to Mobiconnect->Connector Setting->App configuration. You can set it up by changing value from below highlited area in magento admin panel.

Note: If it is set to NO then new arrival product group will not appear on homepage of your app.
Enable/Disable Most View
It is a yes/no type field which is used to show most view product group on homepage of your app.
To setup most view product group please go to Mobiconnect->Connector Setting->App configuration. You can set it up by changing value from below highlited area in magento admin panel.

Note: If it is set to NO then most view product group will not appear on homepage of your app.
Enable/Disable Best Selling
It is a yes/no type field which is used to show best selling product group on homepage of your app.
To setup best selling product group please go to Mobiconnect->Connector Setting->App configuration. You can set it up by changing value from below highlited area in magento admin panel.

Note: If it is set to NO then best selling product group will not appear on homepage of your app.
Enable/Disable Home Page Banner
It is a yes/no type field which is used to show banner
on homepage of your app.
To setup banner please go to Mobiconnect->Connector Setting->App configuration. You can set it up by changing value from below highlited area in magento admin panel.

Note: If it is set to NO then banner will not appear on homepage of your app.
Uploading Banner Images
This feature enables you to upload promotional banner for your app home page. For managing and uploading banner image go to mobiconnect->connector setting->manage banner.
To upload new banner image click on Add New Banner Image button on Top Right Corner. On clicking button you will see screen same as in below image.
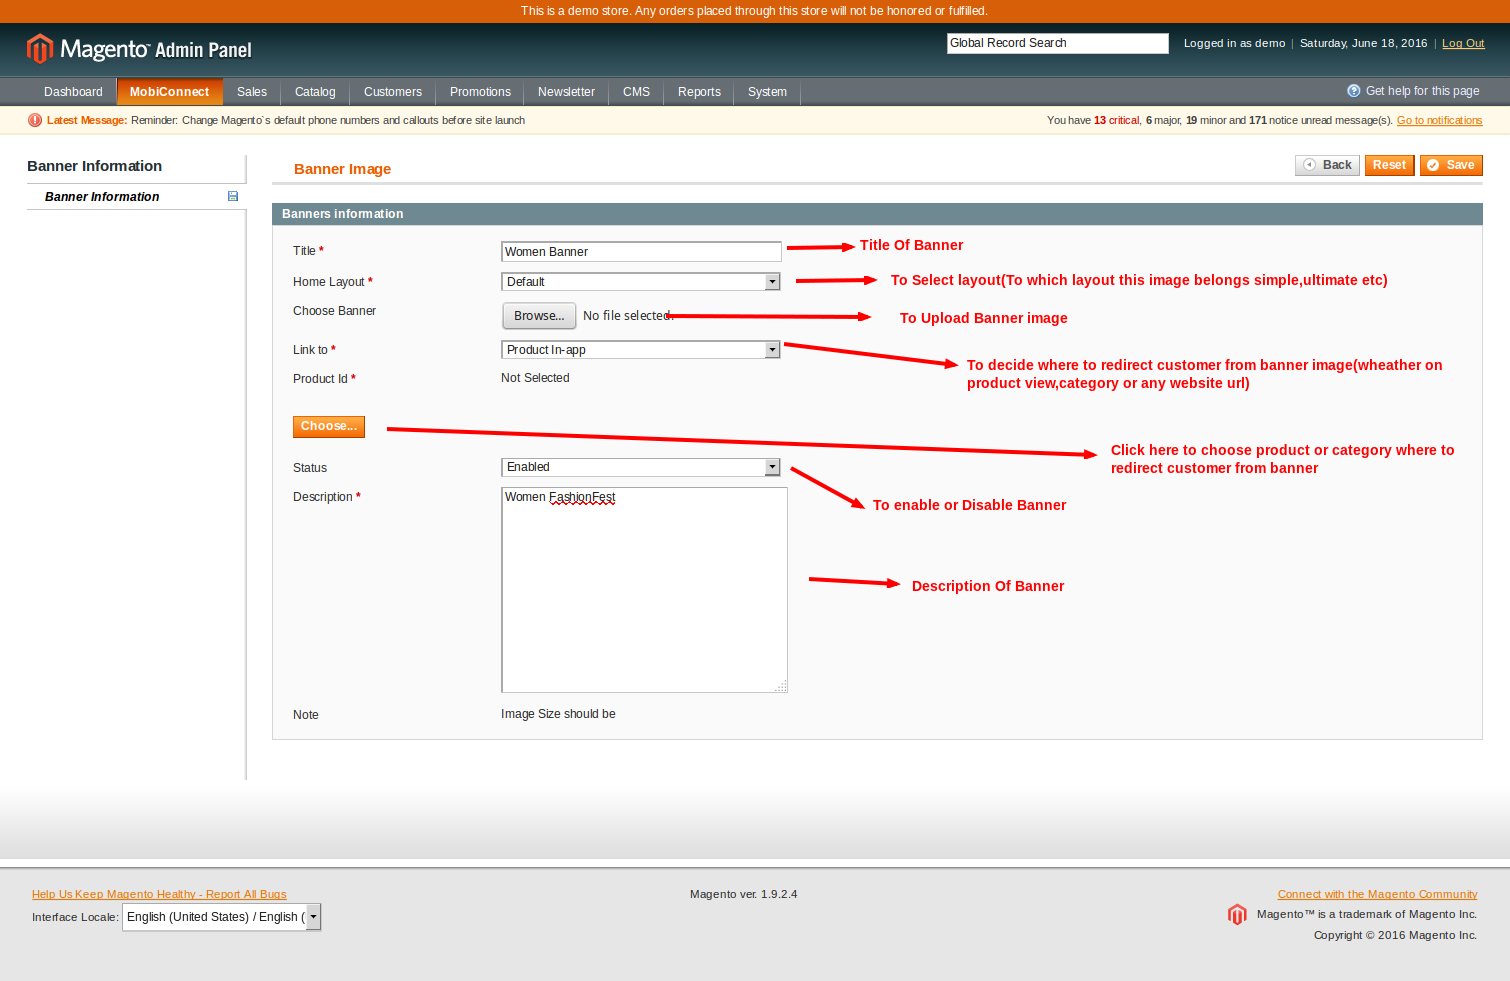
- Title: The title for your banner image.
- Home Layout: The only layout available for basic app is default layout.
- Choose Banner: You can upload banner image from your disk by clicking on browse button.
- Link To: Link to will allow you to redirect your customer to either category page, product page or any other site url on your app when he touches the banner image. You will see product id,category id or website url field depending on the value selected in link to field.
- Product id: If you select link to product in app then you will see product id field and a button with label "choose". On clicking it you will see a popup as in below image.From there you select the product where you want to redirect your customer on touching the banner image
- Category Id: If you select link to category in app then you will see category id field and a button with label "choose". On clicking it you will see a popup as in below image. From there you select the category where you want to redirect your customer on touching the banner image
- Website Url: If you select link to website page you will see webite url field. You have to enter the url where you want to redirect your on clicking banner image. You will be also able to enter url of any other site.
- status: To enable or disable the banner.
- Description: Description for your banner.It will not show on home page.
Assigning Banner Images
Banner widgets will allow you to assign banner images uploaded in previous steps. Only those image which you assigned in banner widget will be shown on app home page. If you create two or more widget then the widget with higher priority will be showed on home page. In case if two or more widget have same priority then in that case the banner which added last will be displayed there.
For home page banner widget please go to mobiconnect->connector setting->widget->Manage home page banner.
For creating new home page widget click on Add banner widget button on top right corner. On clicking button you will see screen same as in below image.
You can assign banner image from selecting banner images from tab Assign Banner.

Configure MageNative Platinum Product App Addon
This addon allows you to upload category banner, creating different layout, auto search and various other features. We will discuss how to configure magento advance product app addon in this step.
Enable/Disable Magento Advance Product App Addon
Advance Cart Configuring Screen looks as in below image.

It includes following fields:
- Enable Auto Complete Search: It is a Yes/No Type field which is used to enable or disable auto search functionality from magento app.
- Show Category Name: It is a Yes/No Type field which is used to show category name & product count on category image in app category listing page. This setting will not work if you didn't upload app category image from admin work.
- Enable Advance Product System: It is a Yes/No Type field which is used to enable or disable Advance Cart Module.
- Limit Result: This field is used to limit the number of product in auto complete search suggestion.
Uploading Category Banner Images
This feature enables you to upload promotional banner for your app category listing page. You can upload the category banner image from the same page of uploading banner image. We already disscussed uploading banner images.
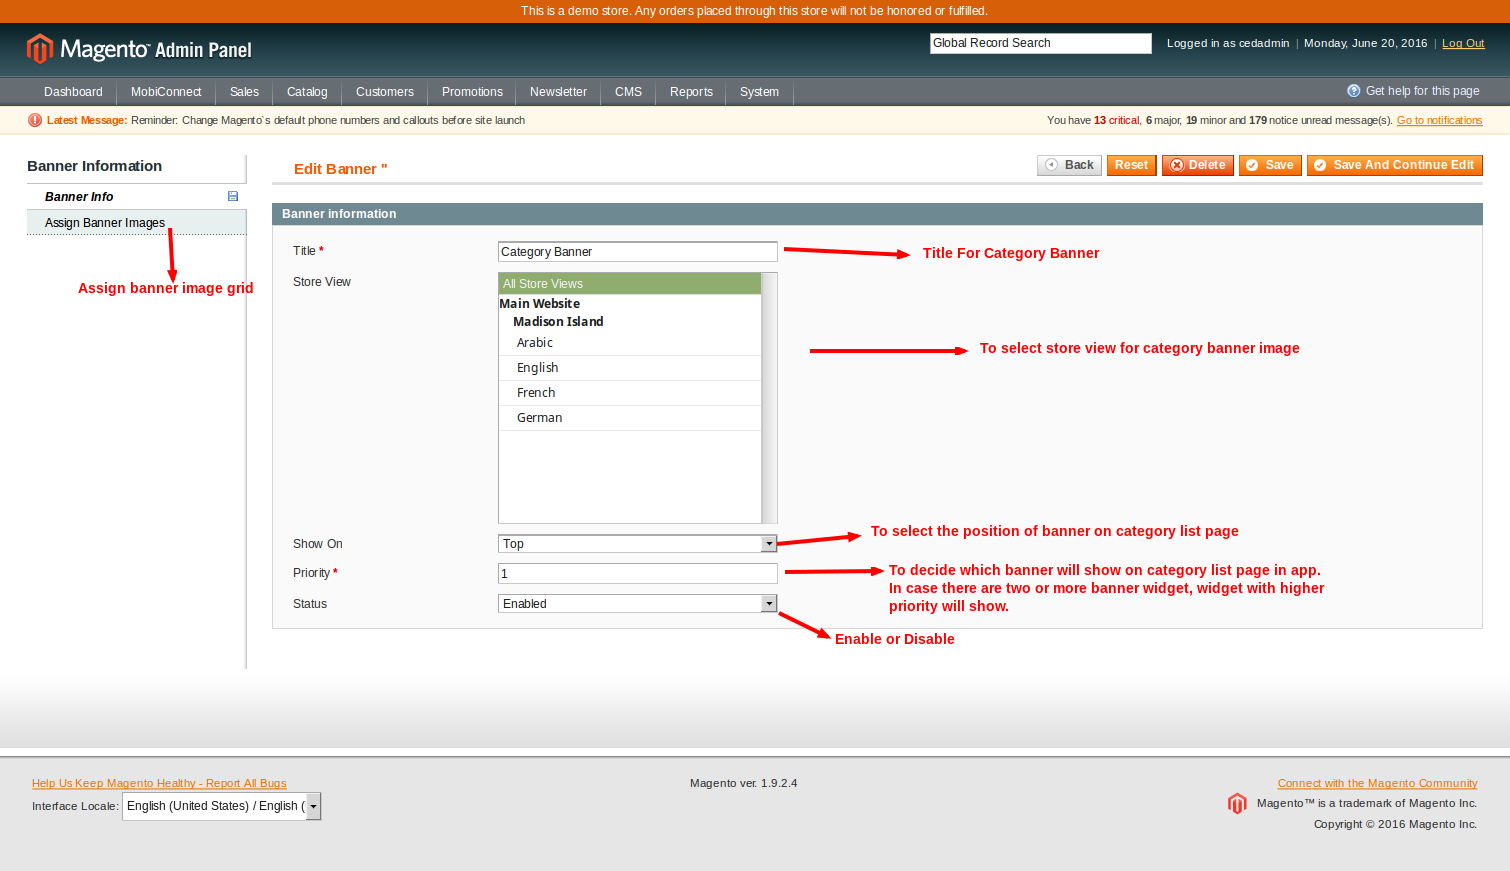
Assigning Category Banner Images
Manage Category Banner widgets will allow you to assign category banner images uploaded in uploading banner images. Only those image which you assigned in banner widget will be shown on app category list page. If you create two or more widget then the widget with higher priority will be showed on home page. In case if two or more widget have same priority then in that case the banner which added last will be displayed there.
For category page banner please go to mobiconnect->connector setting->widget->Manage Category Banner.
For creating new category banner widget click on Add New button on top right corner. On clicking button you will see screen same as in below image.
You can assign banner image from selecting banner images from tab Assign Banner.
Uploading Home Page Layout Images
This feature enables you to upload images for different layout of your app home page. You can upload images for different layout from the same page of uploading banner image. We already disscussed uploading banner images.
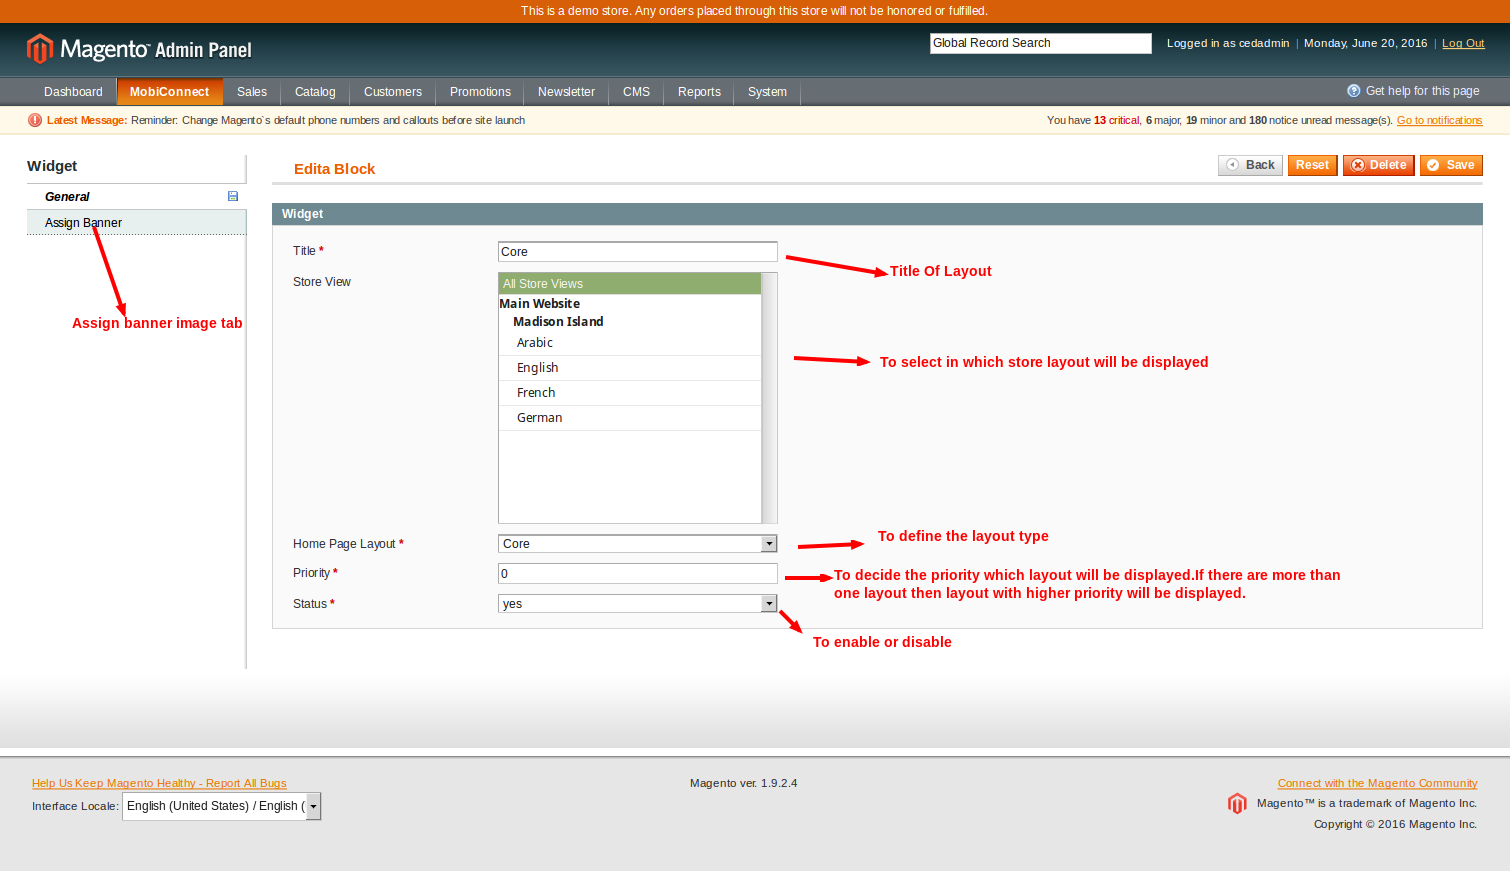
Assigning Images To Home Page Layout
Home Page Layout widgets will allow you to assign home page layout images uploaded in uploading banner images. Only those image which you assigned in widget will be shown on different home page layout. If you create two or more widget then the widget with higher priority will be showed on home page. In case if two or more widget have same priority then in that case the banner which added last will be displayed there.
For creating home page layout please go to mobiconnect->connector setting->widget->Manage Home Layout.
For creating Home Page Layout widget click on Add New button on top right corner. On clicking button you will see screen same as in below image.
You can assign banner image from selecting banner images from tab Assign Banner.
Configure MageNative App Deal Addon
MageNative App Deal Addon allow you to create deals on your store and show it on app with very attractive manner. MageNative App Deal Addon facilitate you to show deal slider at home page with or without timer.
Enable/Disable MageNative App Deal Addon
It is a yes/no type field which is used to enable/disable MageNative App Deal Addon.
To setup MageNative App Deal Addon go to Mobiconnect->Connector Setting->App configuration. You can set it up by changing value from below highlited area in magento admin panel.

Note: If it is set to NO then Deal Addon functionality is disabled.
Create Deal
This feature enables you to create a promotional deal for your app home page. For managing and creating new deals go to mobiconnect->connector setting->manage deals. To create new deals click on Add New button on Top Right Corner. On clicking button you will see screen same as in below image.
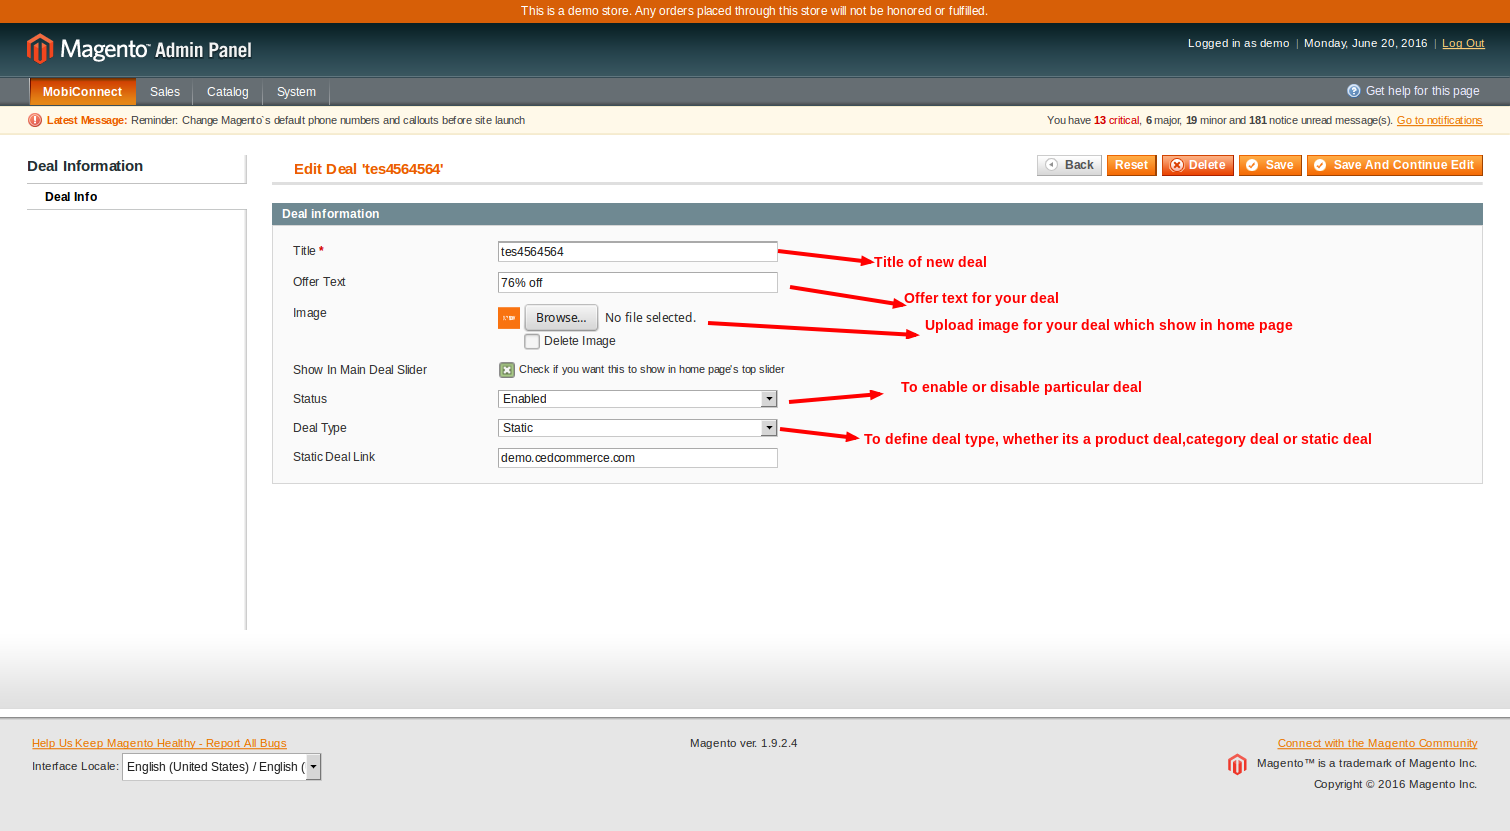
- Title: The title for your deal.
- Offer Text: Offer Text For your deal.
- Image: Upload a deal image which shows on home page of your app. You can upload deal image from your disk by clicking on browse button.
- Show in main slider: Check if you want to show deal in main slider or not in app home page.
- Status: You can enable or disable a particular deal by changing the status.
- Deal Type: Deal type allows you to specify whether it is product deal, category deal or static deal. If you select product deal then a new field is added in same screen with label choose product. You can select the product for which you want to create deal. In similar manner you can create deal for category or static deal. In case of category deal type a new field is added with label choose category and in case of static deal a new field with label static deal link appear.
Create Deal Group And Assigning Deals
This feature enables you to create a deal group for your app home page. For managing and creating new deals groups go to mobiconnect->connector setting->manage deal group. To create new deal group click on Add New button on Top Right Corner. On clicking button you will see screen same as in below image.
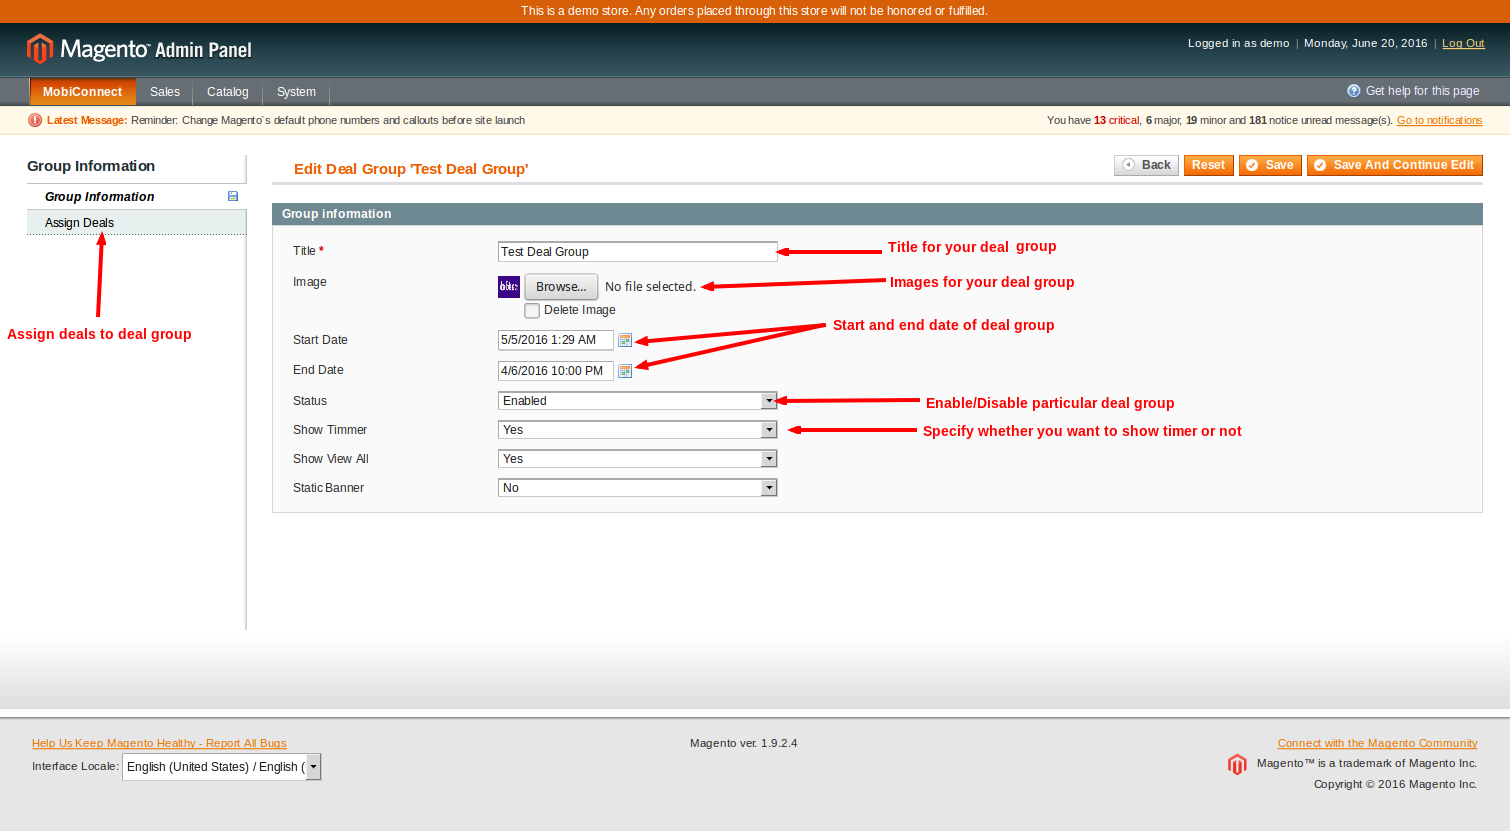
You can create as many deal groups you want to display on home page.
Configure MageNative App CMS Addon
MageNative App CMS addon enable admin to add as many static pages he wants which shows under company in MageNative app drawer menu. This addon also provide functionality to add one static page to every product view page.
Enable/Disable MageNative App CMS Addon
It is a yes/no type field which is used to enable/disable MageNative App CMS Addon.
To setup MageNative App CMS Addon go to Mobiconnect->Connector Setting->App configuration. You can set it up by changing value from below highlited area in magento admin panel.

Note: If it is set to NO then CMS Addon functionality is disabled.
Create New cms page
For managing and creating new cms page go to mobiconnect->connector setting->manage cms page. To create new cms page click on Add button on Top Right Corner. On clicking button you will see screen same as in below image.
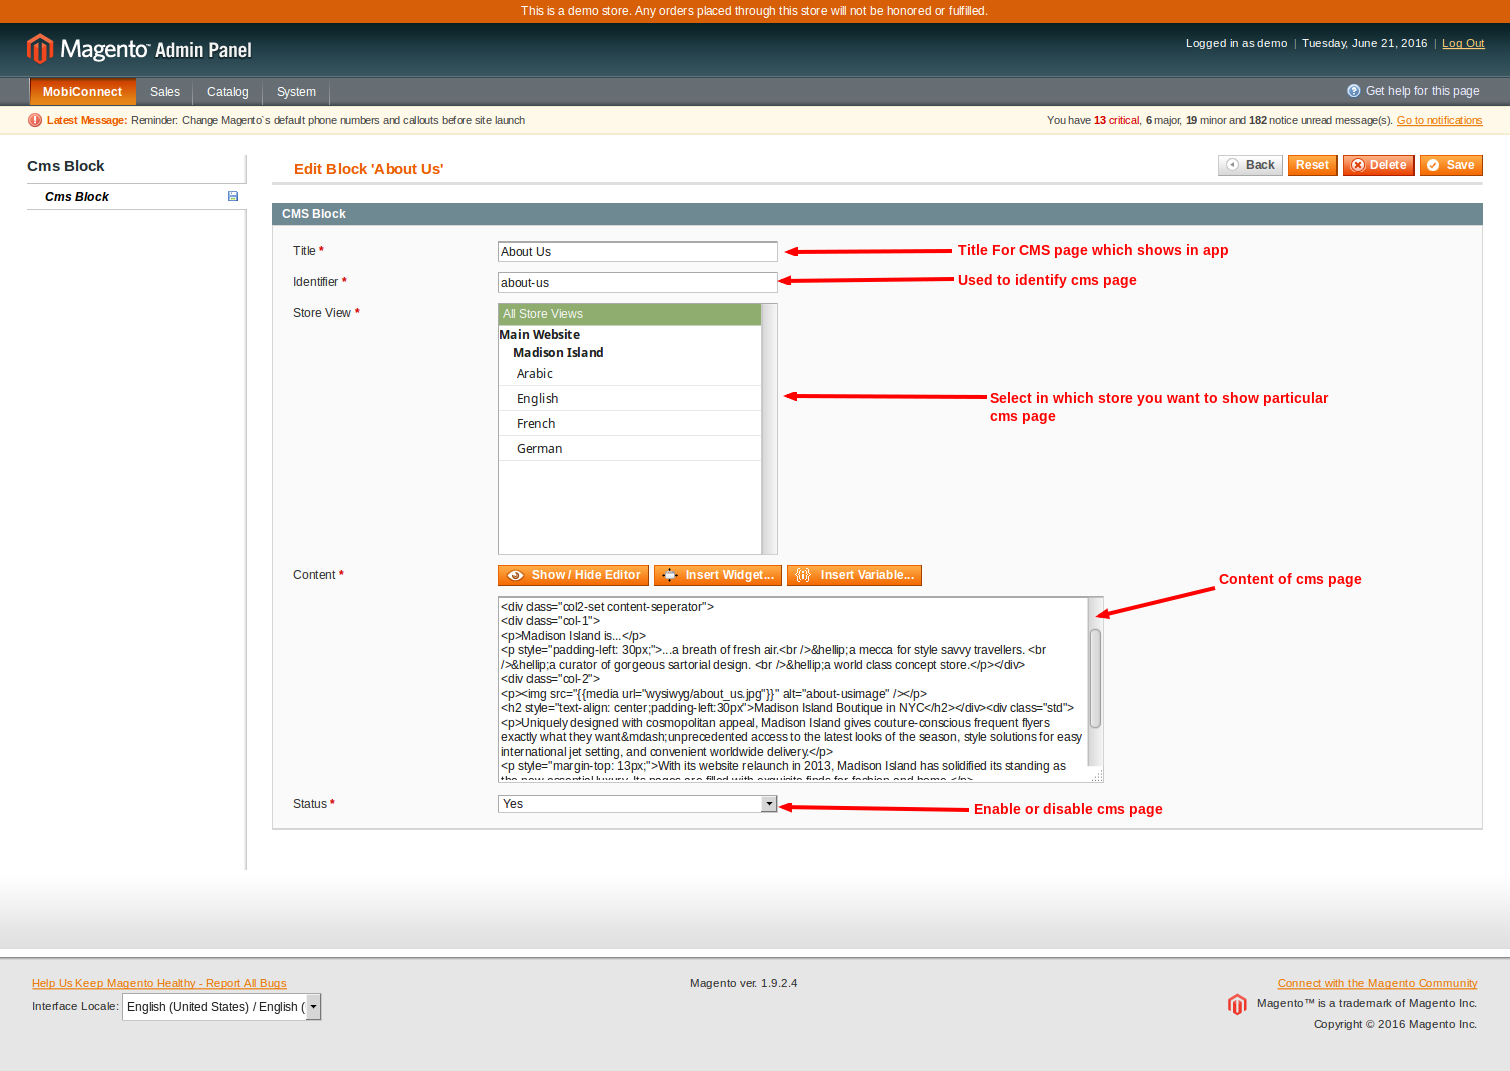
- Title: Title of CMS page which shows inside company in app drawer menu.
- Identifier: It is a unique field which is required to identify the cms page.
- Store View: This field enables you to specify in which store you want to show particular cms page. It enables you to create different cms page for different store
- Content: This field enables you to specify the content of cms page. For better look its recommended you to enter content in responsive manner.
- StatusTThis field enables you to enable/disable particular cms page.
Configure MageNative Notification App Addon
Notification App Addon facilitates admin to notify app users individually or to all users. This addon increase the reach of admin to each users. With the help on this add-on admin can send promotional, Informational, wishes or deals notification to all app users.
Enable/Disable MageNative Notification App Addon
It is a yes/no type field which is used to enable/disable MageNative Notification App Addon.
To setup MageNative Notification App Addon go to Mobiconnect->Connector Setting->App configuration. You can set it up by changing value from below highlited area in magento admin panel.

Note: If it is set to NO then Mobinotification functionality is disabled.
Create New Notification
For managing and creating new notification go to mobiconnect->manage notification->manage notification. To create new notification click on Add New Notification button on Top Right Corner. On clicking button you will see screen same as in below image
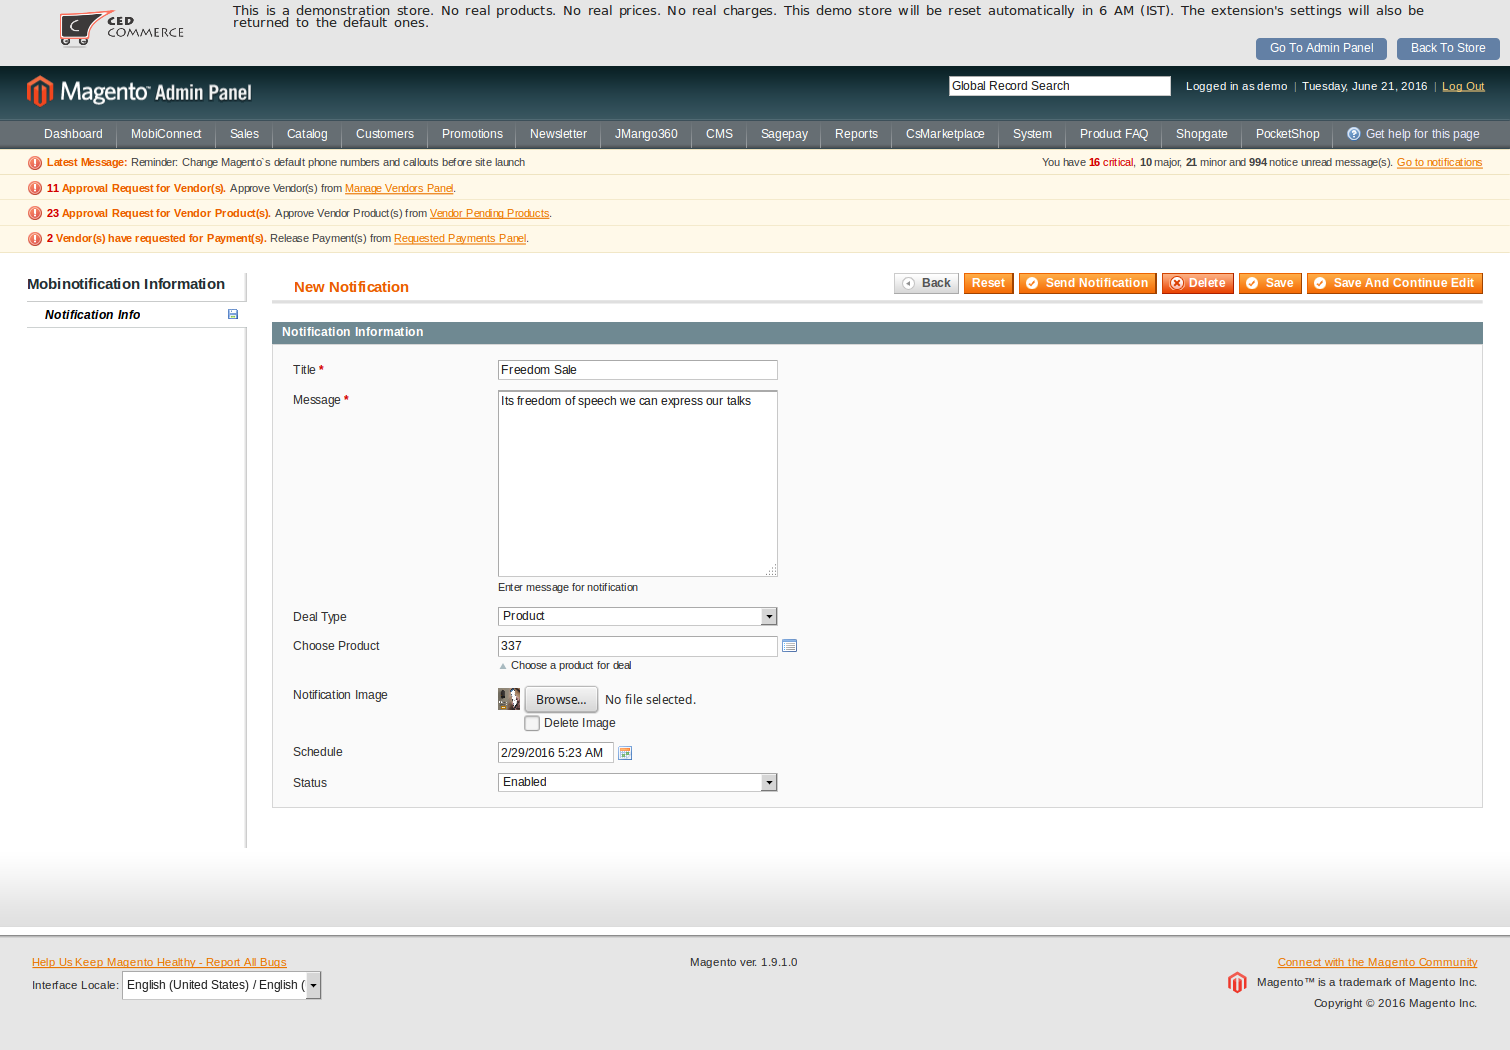
- Title: Title of notification which shows on customer mobile when they receive notification.
- Message: Message which you want send to customer.
- Deal Type: Deal type allows you to specify whether it is product deal, category deal or static deal. If you select product deal then a new field is added in same screen with label choose product. You can select the product for which you want to create deal. In similar manner you can create deal for category or static deal. In case of category deal type a new field is added with label choose category and in case of static deal a new field with label static deal link appear.
- Notification Image: This field enables you to add image to notification message.
- ScheduleThis field enables you to set cron job so that message will be send automatically after specified date and time.
- StatusThis field allows you to enable/disable particular notification.
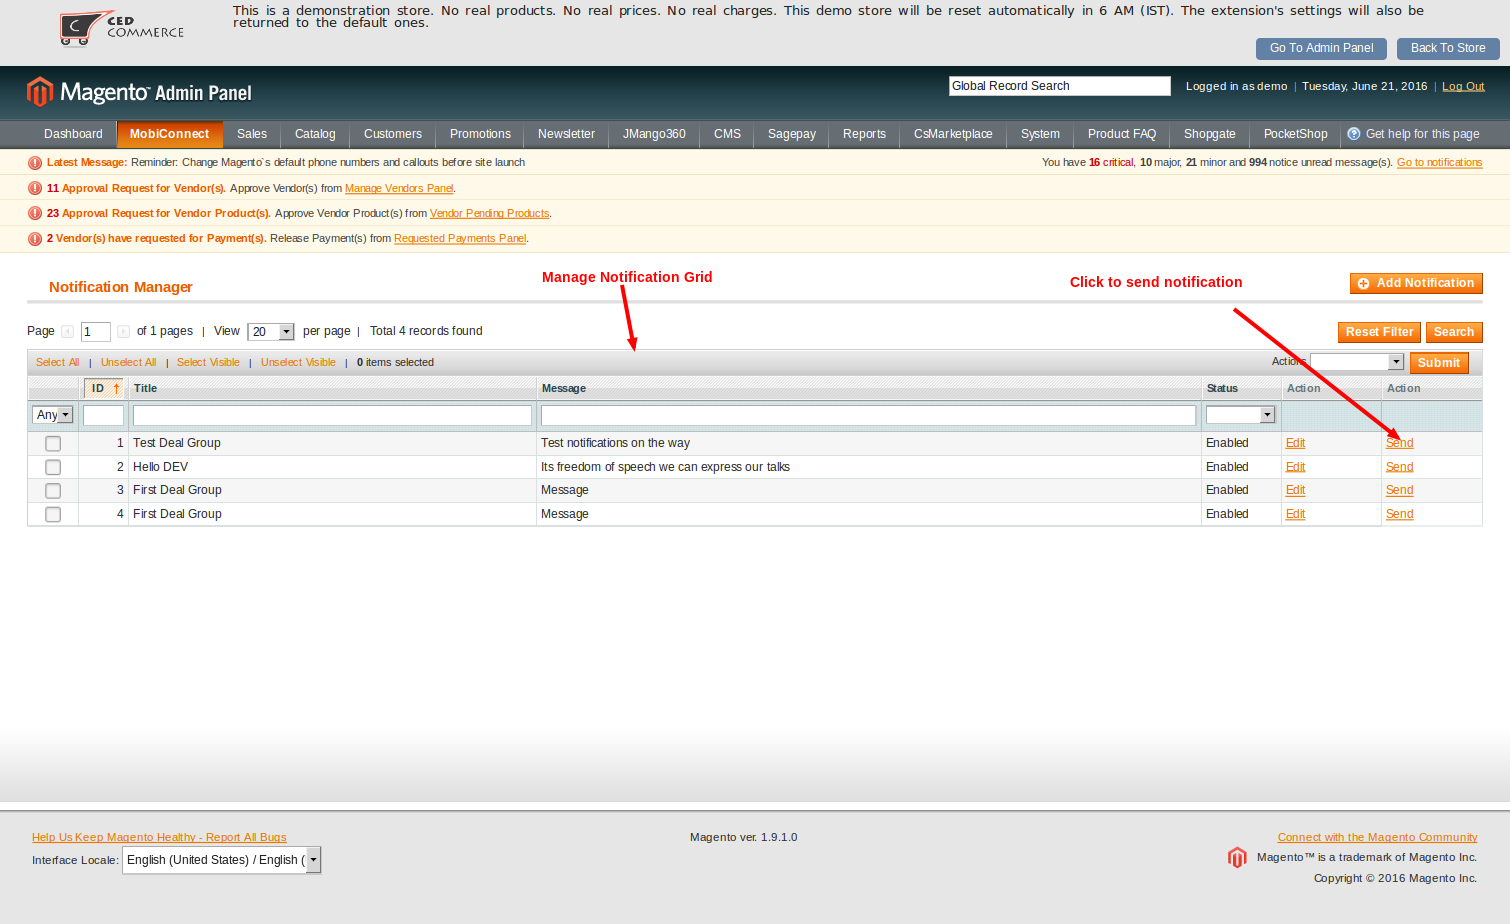
Sending Notification Message
For sending notification message go to mobiconnect->manage notification->manage notification. Manage notification screen looks as in below image.

Configure MageNative Wishlist App Addon
This addon allow customer to add prodcut to their wishlist from app. Customer will also see their wishlist and will be able to update its wishlist.
Enable/Disable MageNative App Wishlist Addon
It is a yes/no type field which is used to enable/disable MageNative App Wishlist Addon.
To setup MageNative App Deal Addon go to Mobiconnect->Connector Setting->App configuration. You can set it up by changing value from below highlited area in magento admin panel.

Note: If it is set to NO then wishlist addon functionality is disabled.
Configure MageNative Review and Rating App Addon
MageNative Review and Rating App Addon Provides facility to users to write review for products.
Enable/Disable MageNative App Review & Rating Addon
It is a yes/no type field which is used to enable/disable MageNative App Review & Rating Addon.
To setup MageNative App Deal Addon go to Mobiconnect->Connector Setting->App configuration. You can set it up by changing value from below highlited area in magento admin panel.

Note: If it is set to NO then review & Rating addon functionality is disabled.
Configure MageNative App Social Login Addon
MageNative App Social Login Addon provides facility to admin to integrate social login in app. Social login facility decrease time and effort of user in registering and login. Which increases customer experience.
Enable/Disable MageNative App Social Login Addon
It is a yes/no type field which is used to enable/disable MageNative App Social Login Addon.
To setup MageNative App Deal Addon go to Mobiconnect->Connector Setting->App configuration. You can set it up by changing value from below highlited area in magento admin panel.

Note: If it is set to NO then social login addon functionality is disabled.
MageNative App Multi Language/Currency Addon
MageNative App Multi Language/Currency Addon provides facility to manages stores on apps. Admin can choose desired store to list in app.
Enable/Disable MageNative App Multiple Store Addon
It is a yes/no type field which is used to enable/disable MageNative App Multiple Store Addon.
To setup MageNative App Multiple Store Addon go to Mobiconnect->Connector Setting->App configuration. You can set it up by changing value from below highlited area in magento admin panel.
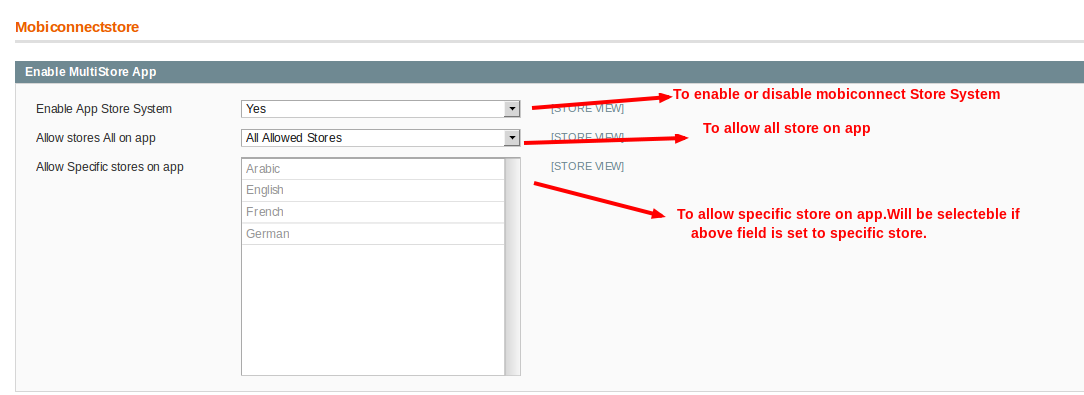
Note: If it is set to NO then MageNative App Multiple Store Addon functionality is disabled.
Configuring MageNative Advance Checkout App Addon
MageNative Advance Checkout App Addon makes all payment methods(non-redirecting) available for checkout in app.
Enable/Disable MageNative Advance Checkout App Addon
It is a yes/no type field which is used to enable/disable MageNative Advance Checkout App Addon.
To setup MageNative Advance Checkout App Addon go to Mobiconnect->Connector Setting->App configuration. You can set it up by changing value from below highlited area in magento admin panel. You can also change color scheme of checkout according to your app from MageNative app.
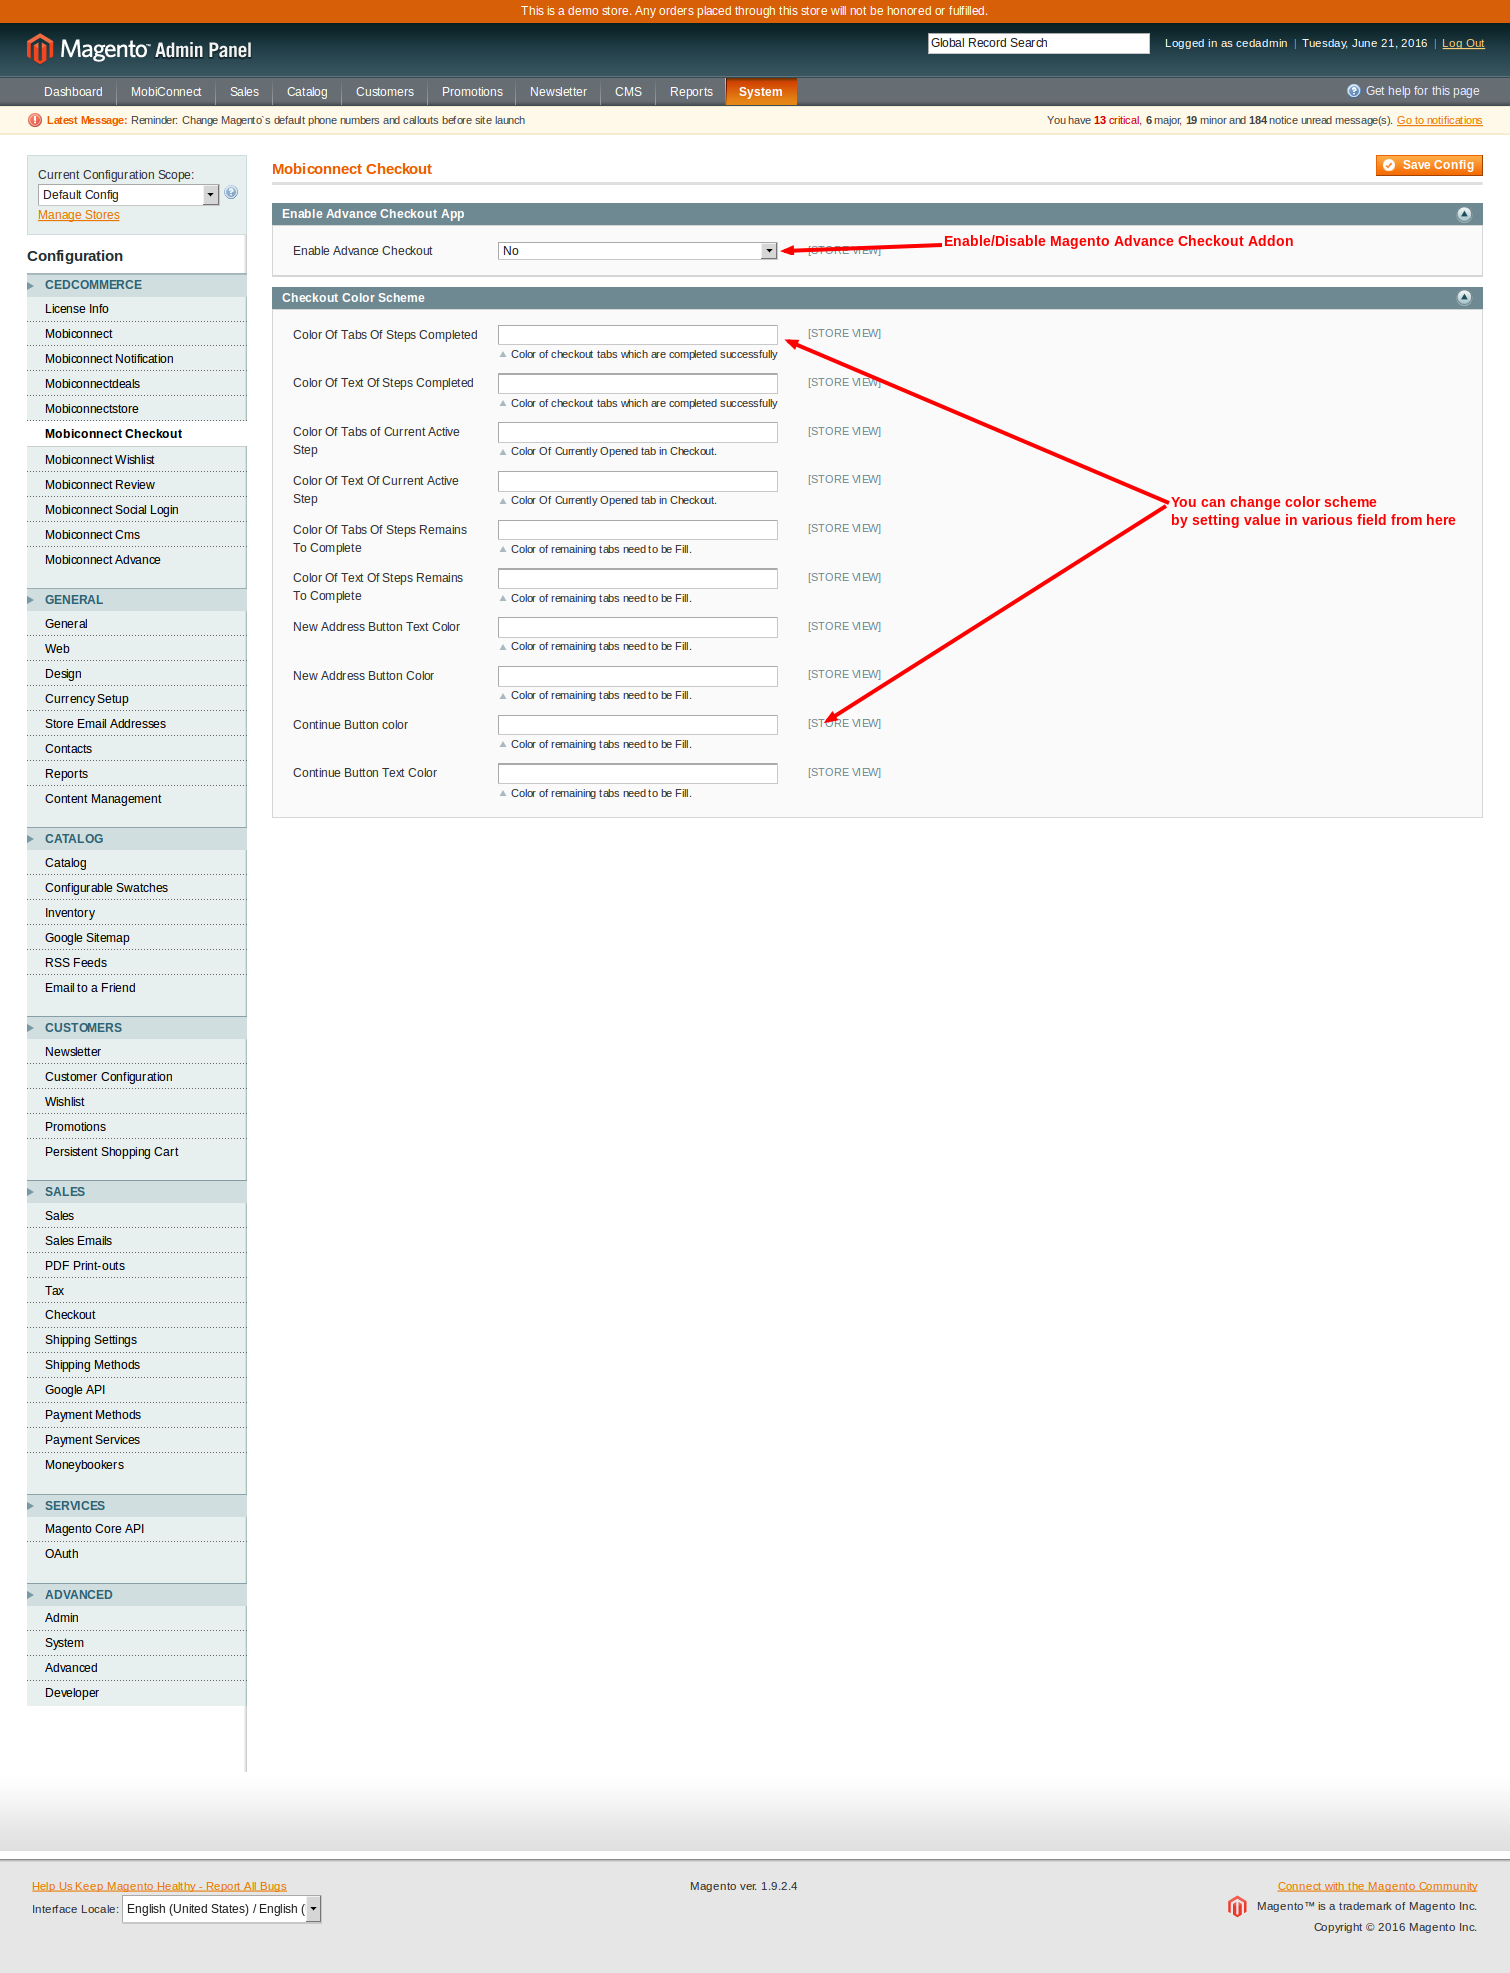
Note: If it is set to NO then MageNative Advance Checkout App Addon is disabled.